
vCenter Simulator CI Pipeline
- vCenter Simulator Docker Container
- vCenter Simulator CI Pipeline
Have you ever wanted to test against VMware vCenter, but didn’t have a lab environment available? How about in an automated fashion, every time you commit new code?
My prior post in this series introduces consuming the govcsim project via Docker. With a containerized vCenter Simulator (VCSIM), not only can you locally test your VMware code without a lab environment, but you can get cute running automated tests as well.
By storing your code in source control like GitHub, you are unlocking the potential of a continuous integration (CI) pipeline. After every new code commit, your CI pipeline can automatically start the VCSIM container, download PowerCLI, and run your automated tests against the newest code you just committed.
This walkthrough uses PowerCLI and Azure Pipelines, but you could apply these concepts to any vSphere code (e.g. pyvmomi, govmomi) and any CI pipeline provider (e.g. GitLab, AppVeyor).
Table of Contents
GitHub: vcsim-CI
A GitHub repository can be connected to Azure DevOps as a new “project.” Every time you push a commit to the repo, Azure Pipelines can automatically trigger a new build to test the changes you just made: a CI pipeline.
This repository uses three files in Azure Pipelines:
azure-pipelines.ymlbuild.ps1Tests\!vcsim.Tests.ps1
I tried to keep this as barebones as possible, to explain what I think is necessary and allow you to build from there. Let’s examine the contents of each file.
azure-pipelines.yml
The presence of this file tells Azure Pipelines to run. What it does depends on the contents of the file.
A .yml file means you’ll want to tab open a YAML schema reference, because that’s #devops life in 2019.
Allow me to quickly summarize what this file is doing:
- Use a Microsoft-hosted Ubuntu VM
vmImage: ubuntu-latest
- Download and run the VCSIM container locally on Ubuntu
- Run the
build.ps1PowerShell script (see next section) - Run your PowerShell/PowerCLI tests with the Pester test framework
- Read back the test results and store them in Azure Pipelines
As of this writing, ubuntu-latest = ubuntu-16.04. Note that Docker and PowerShell v6 are included in the image.
Azure Pipelines can run Windows, Mac, and Linux jobs side-by-side, which enables you to provide excellent cross-platform support. However, the Windows Server images can’t run Linux-based containers, and the Mac images don’t include Docker. I’m running the container locally, so this leaves me with only Ubuntu of the Microsoft-hosted VMs to test on.
I suspect these problems can be overcome, but I reached my patience threshold. Let me know if you have this working in Azure Pipelines on Windows or Mac!
build.ps1
Really, all this file does is install PowerCLI (to connect to VCSIM from PowerShell) and Pester (to run PowerShell tests).
For the sake of being thorough: it also trusts the PowerShell Gallery, runs first-time PowerCLI setup, and outputs the module versions in case you need to dig through the logs when troubleshooting.
!vcsim.Tests.ps1
Put all your Pester *.Tests.ps1 files in the Tests directory. Invoke-Pester runs test files alphabetically, so you’ll probably want the meta tests running first. The tests included in this first file:
- Connectivity
- Does it see VCSIM locally on port 443?
- PowerCLI
- Connect to VCSIM
- Does it see the default number of datacenters, hosts, and VMs?
You want a test expecting a non-zero number to be sure it’s connected. You don’t need three tests, but I kept them just as examples.
Viewing Results
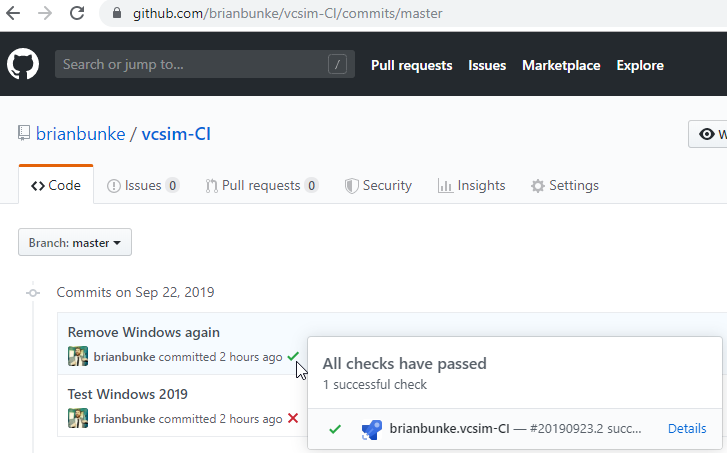
In your GitHub repository, viewing your commit history will show ✅ or ❌ to denote whether any error was returned during each build. Clicking the “Details” link will take you to the Azure Pipelines build.

Whether these tests pass or fail, the test results will always() publish back to Azure Pipelines.

Current Hurdles
Azure Pipelines on the free plan doesn’t let you cache resources to speed up builds (e.g. container, modules).
As alluded to above, I’m not sure if there is a better way to interact with VCSIM besides just running it locally. Most Pipelines documentation I found concerning Docker involves publishing containers, not consuming them.
This is a good time to remind you that VCSIM mocks vSphere APIs, and is nowhere near full parity. (See prior post for how to generate the list of available methods.)
It’s also difficult to define a static simulator state. You can define the number of VMs generated, for example, but you can’t name or size them. (docker run --rm -d -p 443:443/tcp nimmis/vcsim --vm 0) In my testing with datastores specifically, datastore size jumped between three different values from test to test, and I had trouble adding my own via PowerCLI.
If you can help teach me how to fix any of these problems upstream in the govcsim source, I’ll definitely blog it. 😉
vcsim-CI on GitHub