
Write Your Own Vester Test
- Introducing Vester
- Vester 2: Vest Harder
- Write Your Own Vester Test
- Video Vester
Relevant Vester links, conveniently up top for your reference:
- The project is published on the PowerShell Gallery and maintained, open-source, on GitHub
- Documentation is available on ReadTheDocs
- Sorry, they’re currently a bit outdated. Refresh coming very soon!
- Chat with users & maintainers on VMware {code} Slack, in the #vester channel
And maybe a Table of Contents would be useful for quick jumps?
- Vester test directory structure
- Why .Vester.ps1?
- Understanding test contents
- What do you want to test?
- Copy a test to get started
- Edit values in the test
- Will it blend?
- Sharing your work
- I can’t feel my fingers anymore
Vester test directory structure
All Vester tests packaged with the module are stored beneath the \Tests\ directory. You’ll find tests in the following subfolders, currently:
Tests
  |- Cluster
  |- Host
  |- Network
  |- vCenter
  |- VM
These folders aren’t arbitrary. If a test exists in the host folder, it will run against your hosts. It will not run against your clusters, VMs, etc.
If a test is not in a folder with one of those names, it will bomb out, because it uses that parent folder name to help pull the correctly scoped objects. You can store tests whereever you want, but they still rely on their parent folder having one of those five names.
Why .Vester.ps1?
I wanted an easy way to leverage Get-ChildItem for recursively grabbing all Vester tests below a directory. Really, I just copped the idea from Pester (*.Pester.ps1). Vester tests have a very specific format inside, so I figured it wasn’t that big of a deal to follow a unique name format.
Understanding test contents
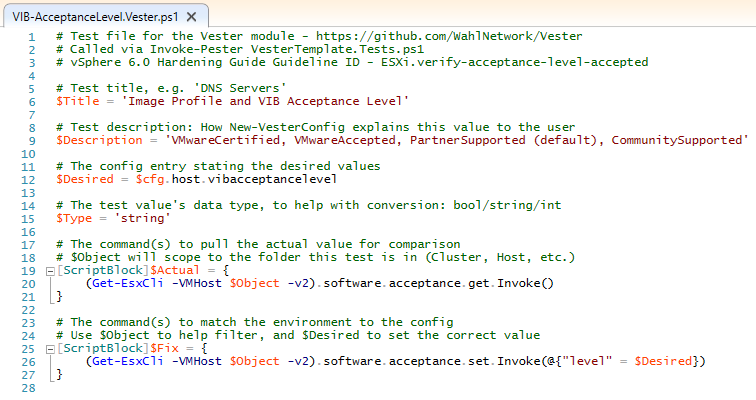
I’m going to revisit the test I screencapped in the first post, and really dive into the guts and explain everything’s purpose. In other words:
Welcome, Morty. Welcome to Anatomy Park!
Hmm. Somehow that reveal didn’t have the same effect.
- 1-2: Generic intro lines
- 3: Additional comment line for context. This test relates to the vSphere Hardening Guide
- 5-6
$Title: A brief name. Used in theItblock’s name and the-WhatIfwrapper right now - 8-9
$Description: A one sentence summary of the test. Used inNew-VesterConfigright now, but may be leveraged for a new feature in the future - 11-12
$Desired: In Vester’s vocabulary, desired = “this is the value I want my object to return”- The value itself isn’t hardcoded in the test. Rather, it refers to one line in your config file. We refer to the config file itself as
$cfg, and then.host.vibacceptancelevellines up with the stored value in theconfig.jsonfile - In addition,
New-VesterConfigwill look here to see how to store the value it pulls
- The value itself isn’t hardcoded in the test. Rather, it refers to one line in your config file. We refer to the config file itself as
- 14-15
$Type: We ran into some small issues serializing/deserializing the config.json file, and PowerCLI occasionally returning super customized types we couldn’t do much with. This basically says, should I cast the value as astring/string[]/int/bool? (The type options aren’t hardcoded anywhere, so you’re free to try something else and see what happens) - 17-21
$Actual: The line(s) of code that pulls the actual current value- You must include
$Object. Instead of saying(Get-VM sleepy).PowerState, it has to be(Get-VM $Object).PowerStatefor Vester to work - Remember at the beginning of the series when I said this is pretty similar to DSC at the end of the day? Well, “actual” = “get”
- You must include
- 23-27
$Fix: If Vester confirms that your desired value and your actual value are not the same, and the-Remediateparameter was specified, then the fix block will attempt to immediately resolve the discrepancy- Currently, this script block must include
$Objectand$Desired. Object is used the same way, and Desired is the value you are setting the object to - And thus, it follows that “fix” = “set” in DSC land
- Currently, this script block must include
What do you want to test?
I mean, just brainstorm literally anything that you think should be consistent across all your hosts. Or all your VMs. Or whatever.
Just to provide an example, I’ll stick with checking PowerState on a VM. Maybe not useful to confirm all of your VMs are on, but possibly, and also interesting if you want to narrow down your VM scope from the config file.
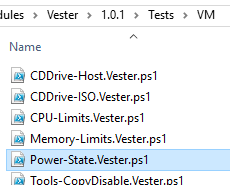
Copy a test to get started
Copy any test, doesn’t matter from where. Because I’m going to write this for a VM, that test needs to sit in the VM folder. Rename it; I’m going to call this Power-State.Vester.ps1.
You technically don’t need a hyphen in your name. We’ve been naming tests in a way that we could potentially group together tests that share a prefix. So in the VM folder, you’ll see a bunch of “Tools-“ and “VMX-“ tests. That may never be implemented, but we’re leaving the option open anyway.
Edit values in the test
You may need admin rights to edit the file, depending on where it’s located.
I’m just going to pop this into the ISE, and list changes here:
Comments- Leave the two default comment lines. No extra lines needed for additional context on this test, IMHOTitle- Change the title to “Power State”- Note that I don’t need to include “VM.” When that title is displayed back to the user, Vester provides enough context for you to know that it’s already running against VM objects
Description- Try to summarize why this test exists in one sentenceDesired- Choose a new config value. Following the convention of$cfg.x.y:- ‘x’ should already exist, and align with the folder your test is stored in
- ‘y’ must be unique
Type- The value possibilities are ‘PoweredOff’ and ‘PoweredOn’. I’ll just store it as astringActual- I need a line of code that provides just the output I want. No extra properties, no property name…completely stripped down to “just the facts, ma’am.”Fix- If the VM fails the test, the Fix code should support starting the VM or shutting it down, depending on the stored config value.
This is what the new test looks like –> Power-State.Vester.ps1
Will it blend?
Once you’ve created your new test, the value needs to be stored in a config.json file. You could add it manually, or you could just run New-VesterConfig again to populate it. If manually adding, in my example, it’ll end up looking like this:

Once the value is stored in your config file, try running it and see what happens. In the power state example, I tested the following:
- Config = off, VM = off. Test should pass
- Config = on, VM = off. Test should fail
- Config = on, VM = off.
-Remediateshould initiate a VM boot - Config = on, VM = on. Test should pass
- Config = off, VM = on. Test should fail
- Config = off, VM = on.
-Remediateshould initiate a VM shutdown
Sharing your work
If you write a test that is generic enough to help the population at large, consider opening a pull request on GitHub to add it to the Vester module! We would love for you to contribute.
Right now, we have no hard rules in place for accepting/rejecting tests, and everything is evaluated at face value upon submission. If the test works (see basic six-step procedure above), and if it is obvious how it would be useful to others, we’re always interested in expanding the Vester test suite.
I can’t feel my fingers anymore
Whew. This is the end of the three-part series introducing you to Vester 1.0. If you made it this far, I love you, and I hope you find the project useful.
I’m going to go ice my hands down.
| Part 1: [Introducing Vester] | Part 2: [Vester 2: Vest Harder] |